DIY: Using Die-Cuts to Make Your Own Cards
How many of you have die cuts lying around in your craft room – unloved and unused?
I bet we all do! We might buy a whole sheet of die cuts, simply because we loved 2 or 3 of them, but the rest? No idea what to do with them.
I hate waste, so for this project today, I wanted to find ways in which I could use those random die cuts and whip up some DIY custom birthday cards.
These die cuts are really old! They are by Fancy Pants (I think??), but I think they can easily be 5 or so years old! So I did good, don’t you think?
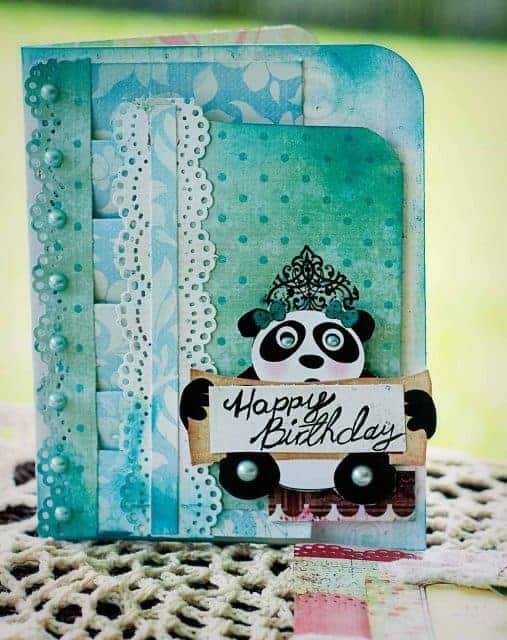
1. DIY Happy Birthday Card

This beautiful Happy Birthday card was created by using a panda die cut as a feature. I wasn’t sure where else to use this die cut, but you have to admit she is pretty cute!
The die cut itself already had a saying on the banner between the hands (I forget what it said) – so if you look closely you will notice that I simply popped a piece of paper with a handwritten ‘Happy Birthday’ over the top to cover it up.
I really wanted the panda to be the focus, so I lifted her away from the background with some 3D foam. I embellished her eyes and feet with some pretty pearls and gave her a crown with a flourish-style rub-on.
I also folded some normal paper to give a bit of a ‘ribbon’ effect along the left edge. I really love this card and think it came out beautiful!
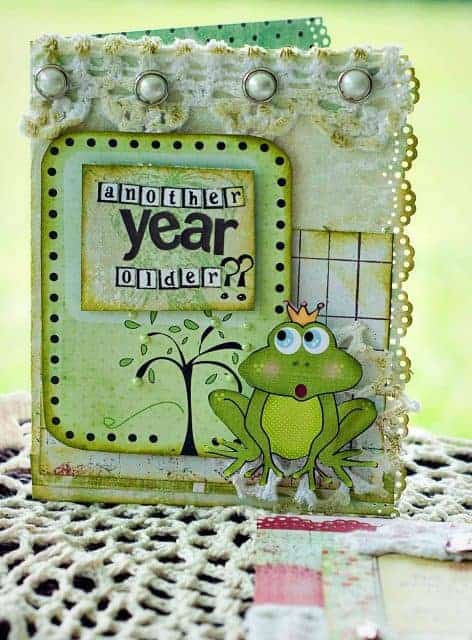
2. DIY “Another Year Older” Card

Very obviously this card is made with the frog die cut. Bit of a weird choice for a card, but I really do feel that the frog really works well here. The card next to the frog with the tree on it, is another die cut from a journaling die cut sheet.
Again I lifted the frog away from the background with some foam tape. I used a decorative edge punch to give the right edge a creative look. Added some cut up doily bits for some lovely texture and simply rubbed some green ink over the doilies to give them a bit more of a muddy pond feel.
I finished the card off with some pearl bling and some pearl brads. I really felt like the pearls would elevate the card to something more elegant (but still fun).
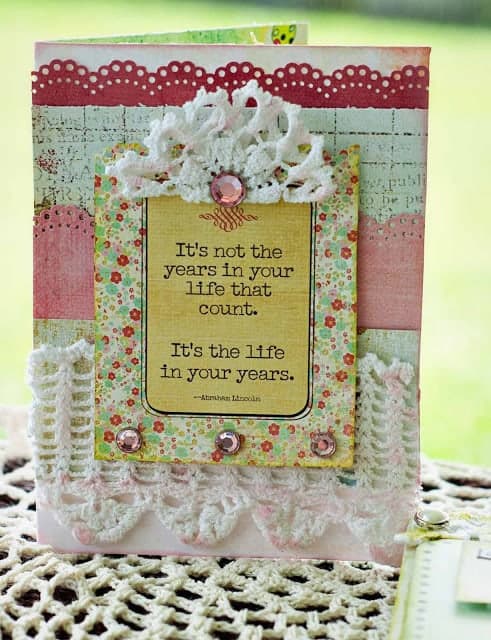
3. DIY “Life in your Years” Card

For this card, I grab another die cut. This die cut already had this quote on it that I felt was perfect for a birthday card for someone a bit older. More foam tape for dimension and more doilies to add a lovely ‘home’ feel. This time I added some bling brads as I felt they just brightened and lifted the layout (where the pearls were making the card feel ‘old’)
Some more decorative borders – quick and easy card done!
I bet you have some die cuts that are just lying around unused. Can you think of a creative way to use them up?
Don’t forget that you can always create your own adorable die cuts. We love using a Cuttlebug (if you don’t mind using dies), but you can read through our die cutting machine review of the ten best machines here.
Hope that inspired you to make some cards today.
Till next time,
Samantha xxx
via The Best Vinyl Cutters | Reviews & Guides https://www.thebestvinylcutters.com/die-cuts-to-make-your-own-cards/


